AgLeader's SMS Advanced can use DroneDeploy imagery as both a visual reference and a data product suitable for NDVI analysis. This guide explains how to export and import your maps for use in SMS Advanced.
Download Orthomosaic from DroneDeploy
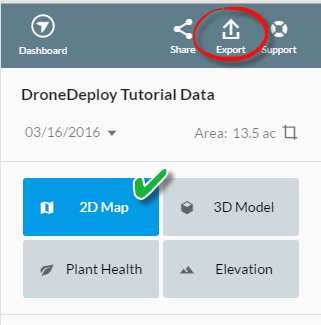
To begin, you must export the map from your DroneDeploy dashboard.
Select the Map you wish to import from the DroneDeploy dashboard.

Choose 2D Map as your map type, and then click Export.
Note: Even if your goal is NDVI analysis, SMS Advanced uses the original orthoimage for the calculations.
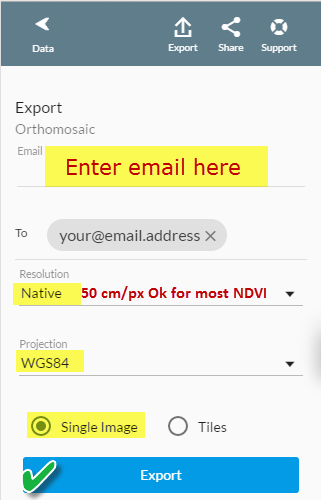
Enter an email address to receive the exported map.
Set the Resolution for the export. Since SMS Advanced can easily get bogged down with high-resolution imagery, consider starting with a Resolution of 50 cm/px initially. If you need more detail, try 20 cm/px. An export at 50 cm resolution (less than 20 inches per pixel) provides sufficient detail for most farm applications and NDVI analysis.
For the Projection, select WGS84 for the widest compatibility.
Select Single Image to deliver the map as one cohesive mosaic.
Click Export to submit your request.
Upon receiving your exported mosaic in your email inbox, click the download link to procure a zip file containing your mosaic.

When prompted, save the zip file to your computer.

Upon completion of the download, locate the downloaded orthomosaic on your computer. Using your preferred file extraction method, extract the orthomosaic from the zip file.
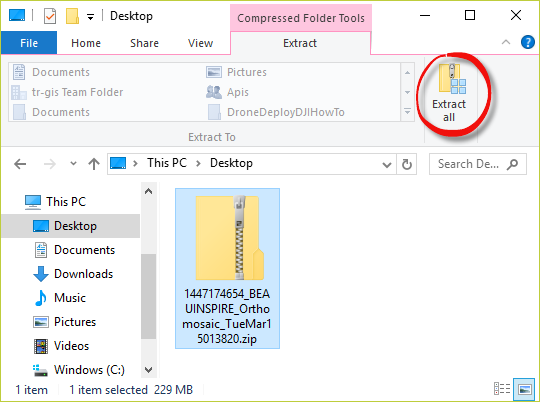
Note: Most modern operating systems have native extraction tools.
To use Imagery as a Background Image
Follow these steps to import your orthomosaic as a background image in SMS Advanced.
Open SMS Advanced. If prompted, click Open an Existing Project.
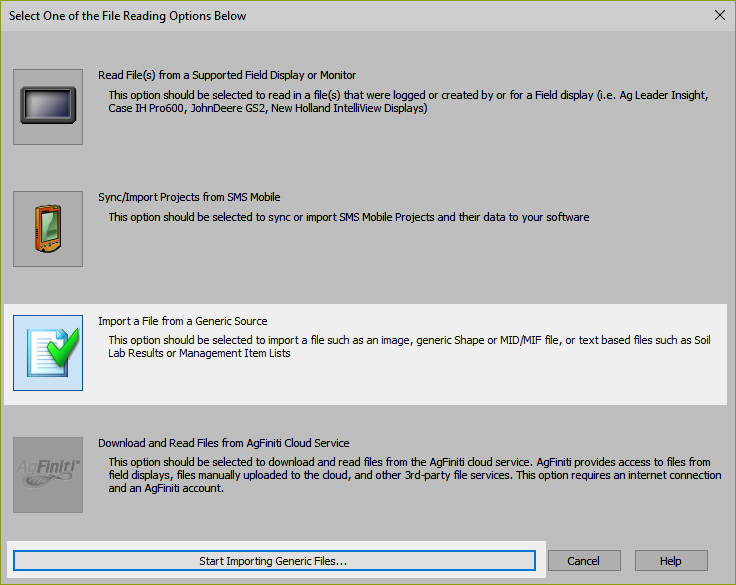
From the menu bar, select Read File(s).
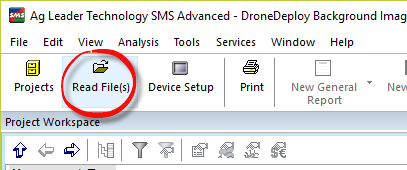
Next, select Import a File from a Generic Source, and click Start Importing Generic Files.
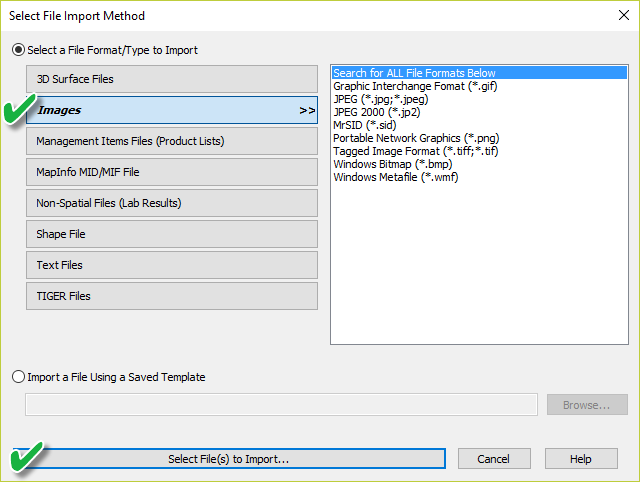
On the Select File Import Method dialogue, choose Images, and then click Select File(s) to Import...
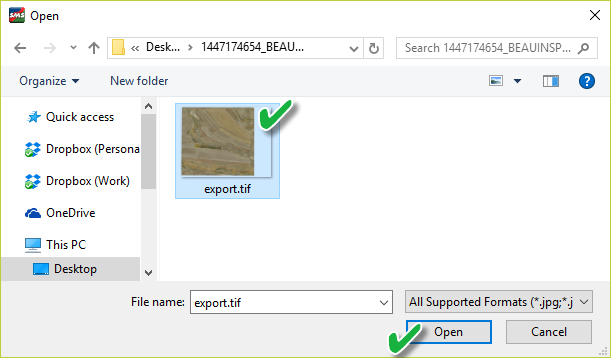
Navigate to the location where the image was saved and click Open the image.
Choose any optional clipping or cropping settings, and click Next.
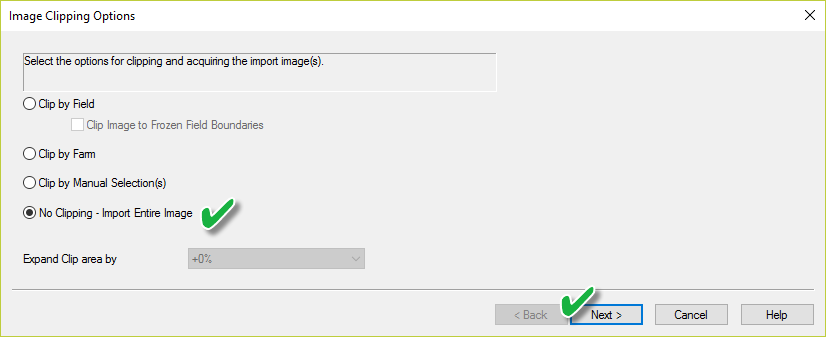
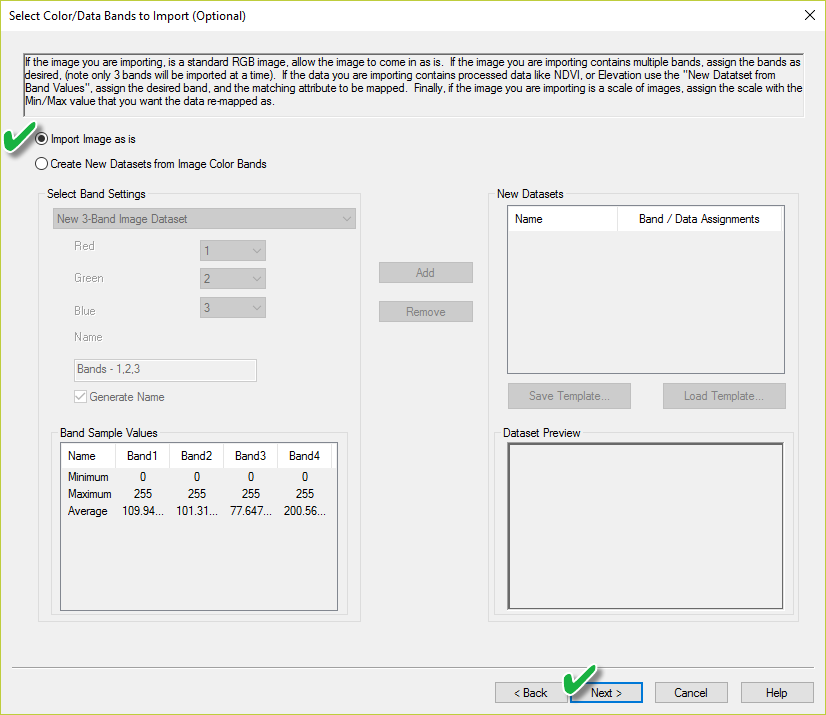
Select Import Image as is and click Next. This is for a standard true color or RGB image.
Choose Add as a Possible Map Background. Be sure to give your background a Description that is helpful (date, field name, etc.).
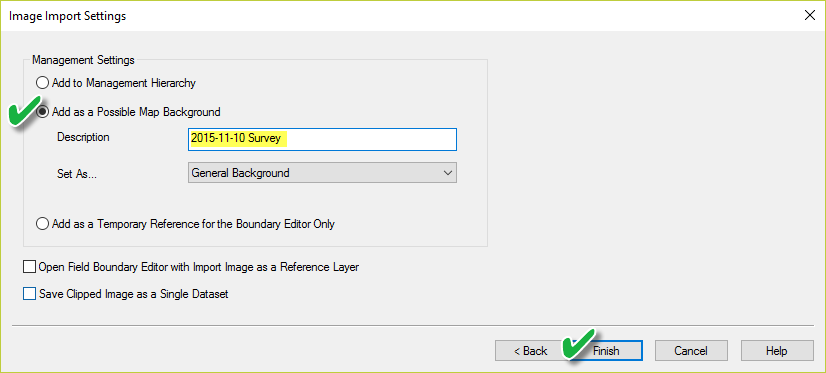
Click Finish to complete the import.
To add the imported map background to a map:
Navigate the Management Tree in your project workspace to either Create New Map from existing data (like shapefiles) or go to an existing open map tab.
From the Map toolbar, select Set Background.
If the Set Background dialogue appears, select Add Background.

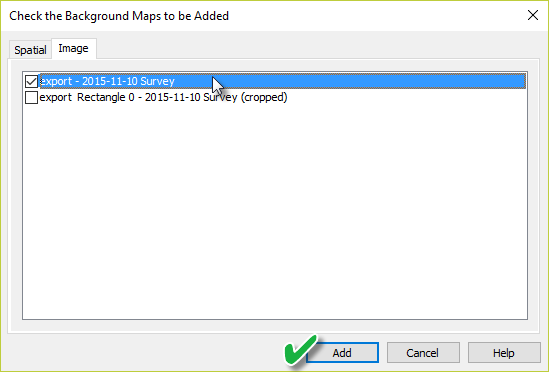
On the Check the Background Maps to be Added dialogue, select your imported ortho imagery and click Add.
With the new background ortho image added and selected, click OK.

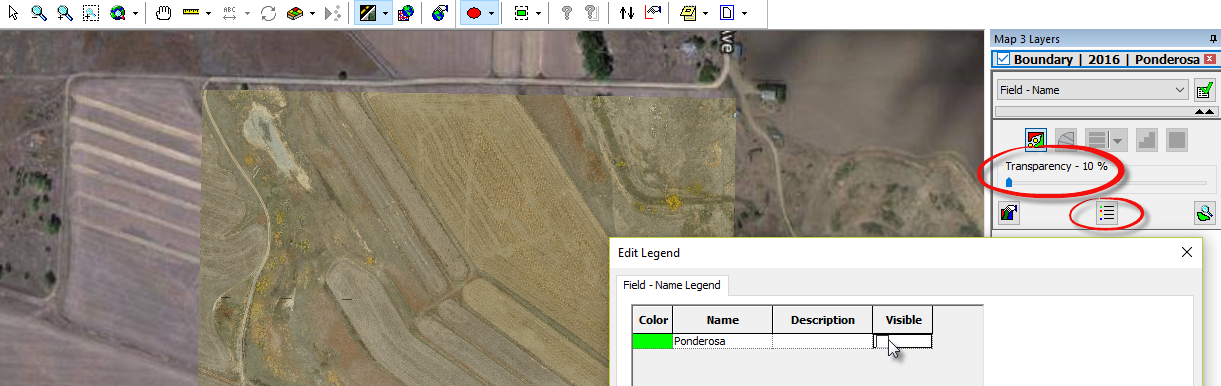
If necessary, toggle off other layers by editing the legend or adjust transparencies using the Edit Legend dialogue and the Transparency slider.
To use Imagery as a Map Layer for NDVI Analysis
Follow these steps to import your orthomosaic as a map layer for NDVI analysis in SMS Advanced.
Open SMS Advanced. If prompted, click Open an Existing Project.
From the menu bar, select Read File(s).
Next, select Import a File from a Generic Source, and click Start Importing Generic Files.
On the Select File Import Method dialogue, choose Images, and then click Select File(s) to Import...
Navigate to the location where the image was saved and click Open the image.
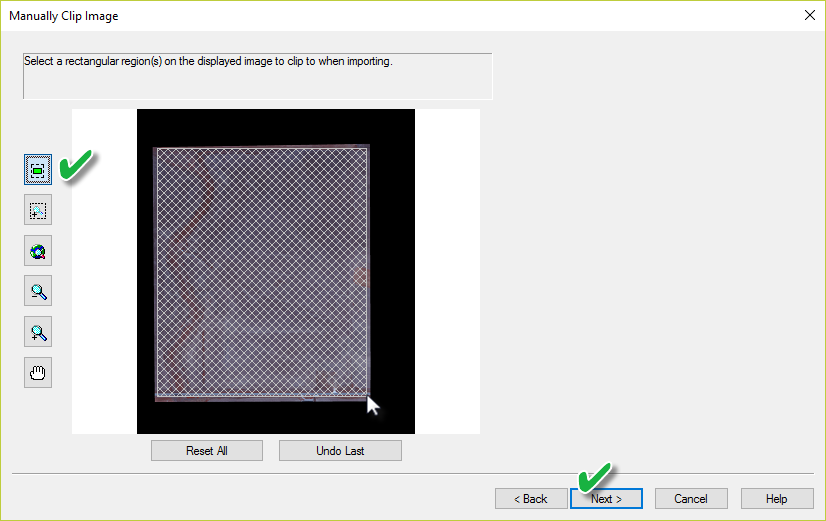
Choose any optional clipping or cropping settings, and click Next. For this example, select Clip by Manual Selection(s) to remove the empty space on the edges of the orthomosaic.
To clip, define your region using the Select Rectangle tool on the top left of the vertical toolbar. Click once on the image to begin defining the region, and click again on the opposite end of the field to finish. Click Next to commit the clip.
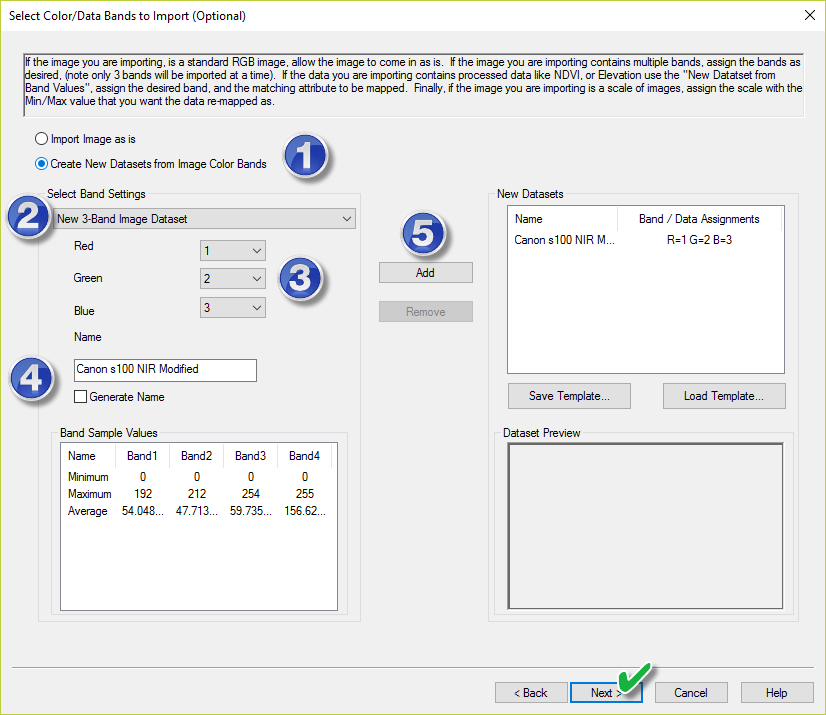
Band assignment is important for NIR imagery. Knowing your camera specification is key. For this example, we assume a modified Canon s100 where the red was modified to receive near-infrared.
Select Create New Datasets from Image Color Bands, and from the dropdown select New 3-Band Image Dataset.
For the purposes of representation, Assign Red to band 1, Green to Band 2, and Blue to band 3.
You can either leave the Generate Name checked or uncheck it and assign your own name.
Click Add to lock-in your band selection as a new dataset and click Next.
Select Add to Management Hierarchy and click Finish to complete the import.

Once imported, select the appropriate Grower, Farm, Field, Year, and Product applicable to your management workflow and click Accept.

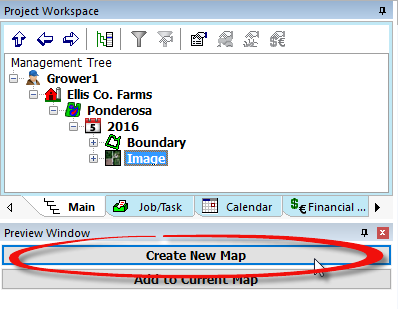
Once added to the Management Tree in the Project Workspace, select the image and Create New Map in which to perform the NDVI analysis.
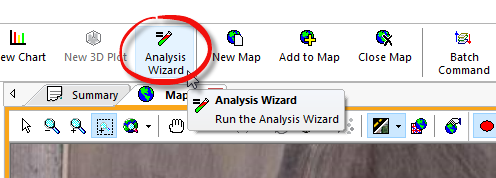
With the new image added to a new map, run the Analysis Wizard.
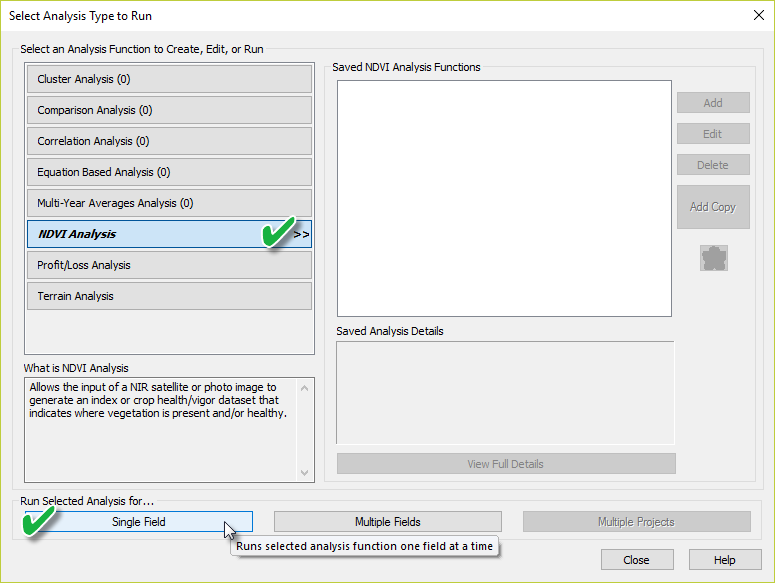
In the Select Analysis Type to Run dialogue, choose NDVI Analysis for a Single Field.
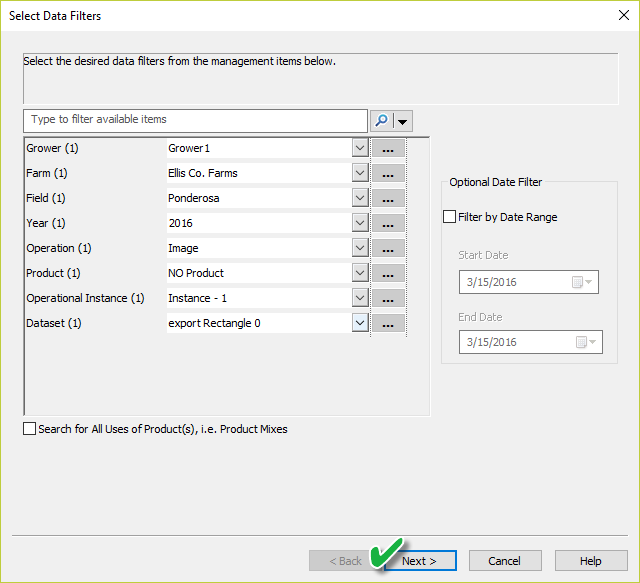
For this demonstration, leave parameters in the Select Data Filters dialogue at defaults. Click Next.
For the NDVI Settings dialogue, you will set the grid size that SMS Advanced uses to assign NDVI values to each pixel. Selecting Use Image Res will yield the most accurate results but will take significant processing time. If processing time is a concern, consider using a value under Manual Grid Size equivalent to two or four times the image resolution.
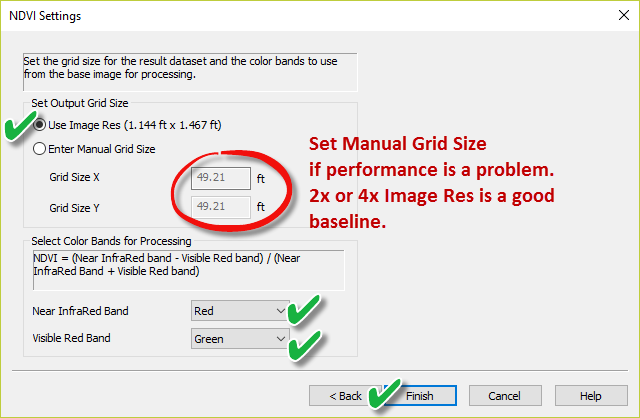
Note: It is not recommended to Use Image Res if your orthomosaic was exported at anything other than 50 cm.
Under Select Color Bands for Processing, you need to know how your camera was set up to assign appropriate bands. For our MaxMax-modified s100 in this example, Red equates to the Near Infrared Band and Green equates to the Visible Red Band.
Click Finish to begin analysis.
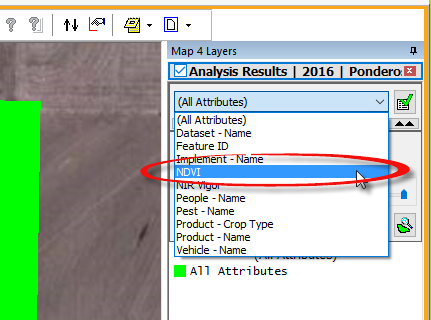
After processing, you will be presented with an Analysis Editor. To save the default analysis, simply click Save so it can be viewed on the map.
On the new map, your analysis will show as one color until the correct attribute representation is selected. Use the Attribute dropdown in the Map Layers pane to select NDVI.
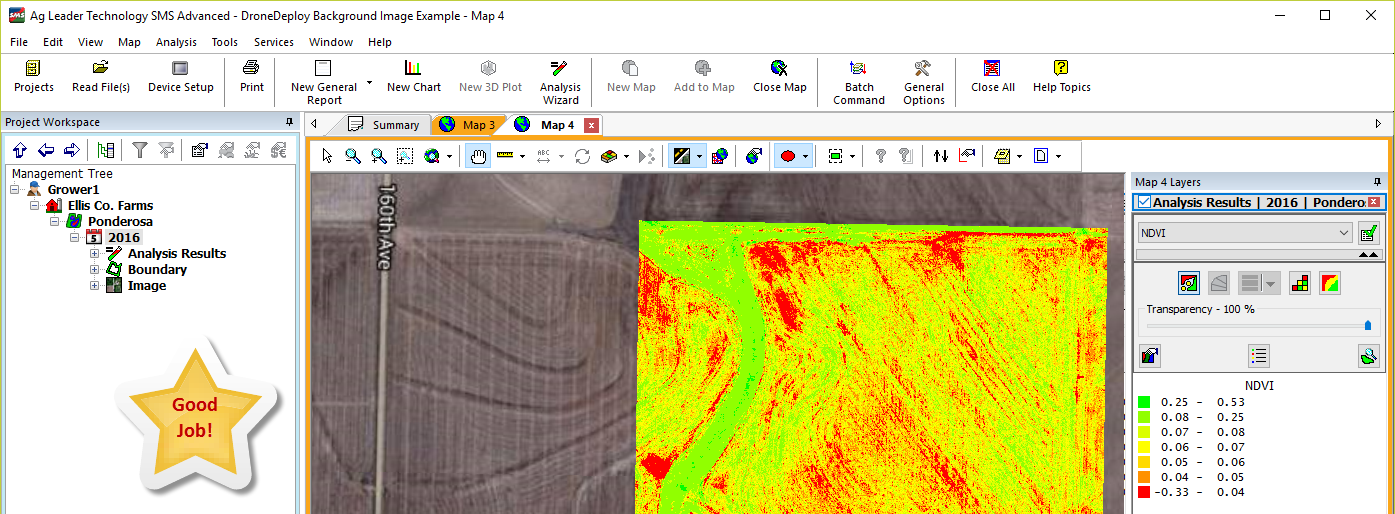
Your near-infrared DroneDeploy flight is now represented as NDVI within AgLeader SMS Advanced.
V2.2