Overview
DroneDeploy provides real-time volume analysis on your maps. This method is a fast and cost-effective way to analyze volumes from any device. Testing shows accuracy within 1-2% compared to traditional ground-based laser methods when you follow best practices.
Availability
Volume measurement is available for all paid DroneDeploy Aerial subscriptions.
The tool functions on both web and mobile platforms.
How to measure volume
Follow these steps to define and measure an area:
Open your project in DroneDeploy.
Click the Annotation icon in the sidebar.
Select the Volume icon from the options.
Click or tap the map to add points and complete a polygon around the area of interest, such as a stockpile.
Adjust the points until the polygon accurately covers the base of the pile.
The system automatically calculates results once you complete the polygon. You can use the cross arrows in the middle to shift the area and recalculate the volume.
Video Tutorial:
Stockpile AI
Stockpile AI is a new machine-learning feature that automatically finds stockpile boundaries in your map to save you time. This feature is available exclusively on our Enterprise accounts.
Selecting an Area and Measuring its Volume
To define a volume to measure, you first need to select an area for which to compute the volume. Volume measurements can be performed on all surface areas, including flat land, stockpiles, and various landscapes.
- Choose the
Volumeicon from theAnnotation & Measurementoptions:
The tools in the lower right allow you to undo, or complete your polygon.
- Add points around the stockpile for which you want to compute the volume.
Click or tap to add points to complete the polygon.
- Adjust the points until you are happy with the area of interest. Here is an example result:
Example volumetric calculation. Units can be displayed in the Metric or Imperial system.
- Using the cross arrows in the middle, you can shift the area of interest to automatically recalculate the result.
Browser Compatibility
Internet Explorer will NOT allow you to create volume measurements. DroneDeploy is best supported on the latest version of Google Chrome.
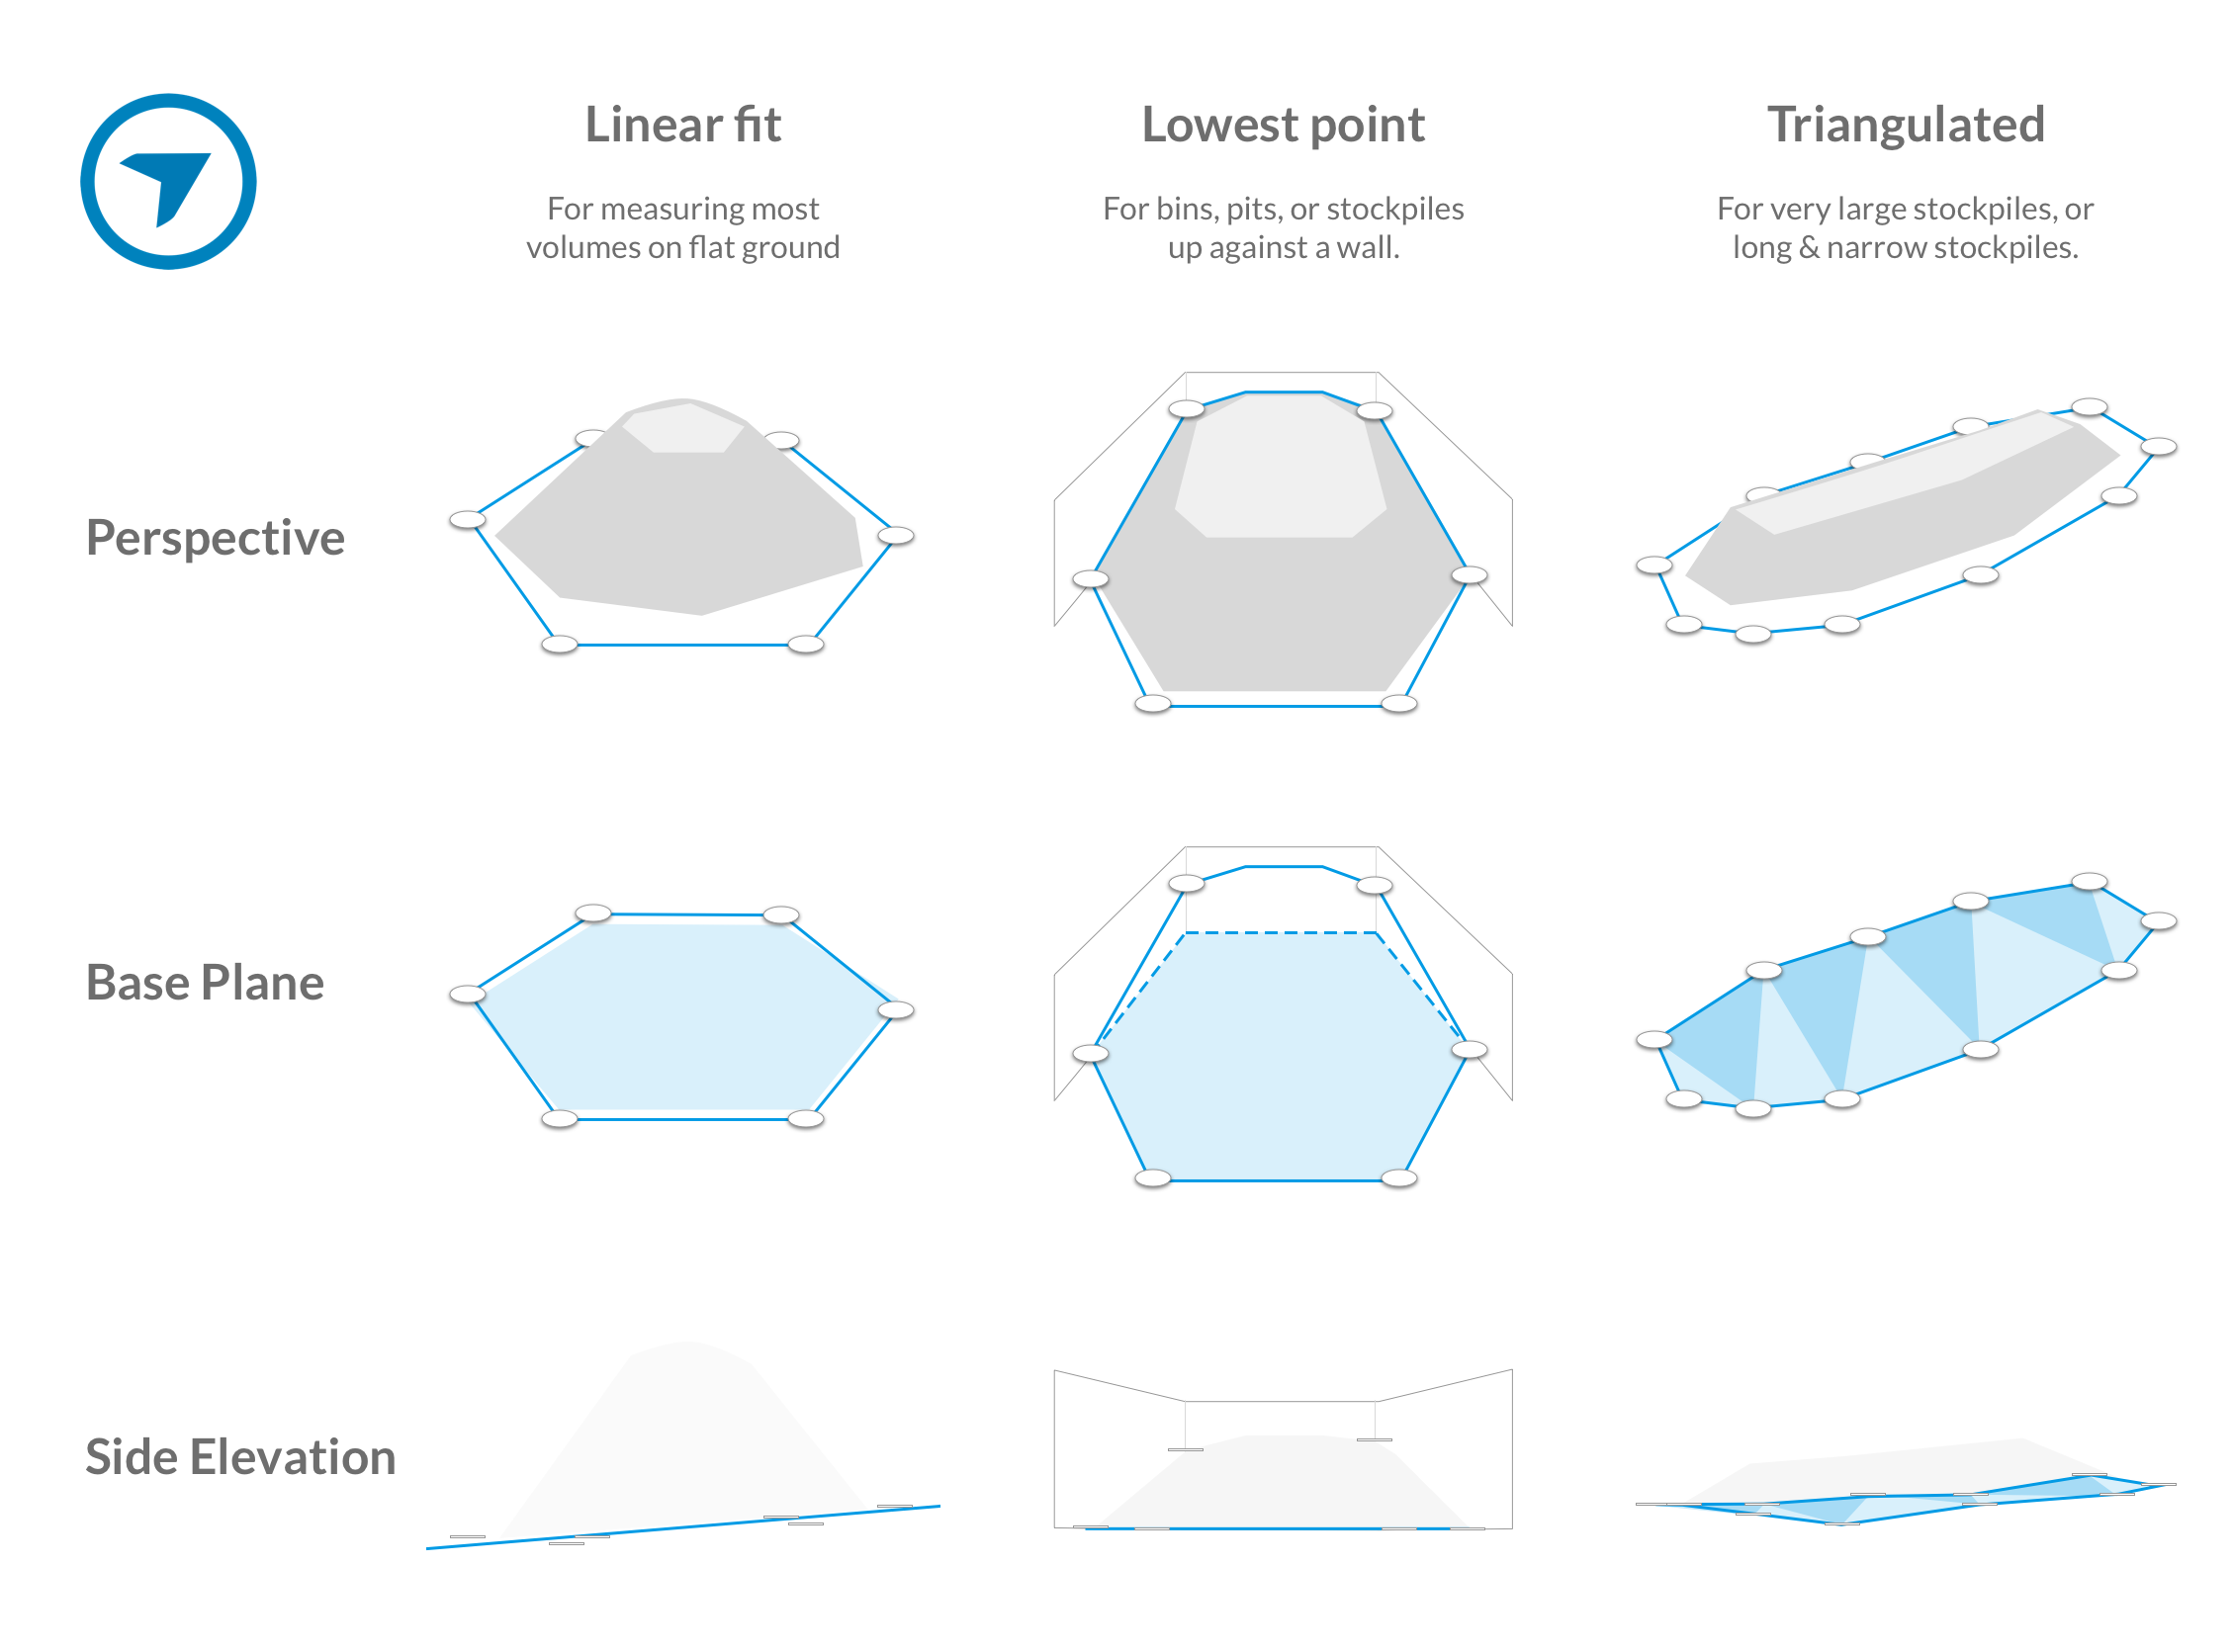
Selecting the right base plane
Choosing the appropriate base plane ensures your measurements remain accurate. DroneDeploy offers 3 base-plane options:
Linear Fit: Best for simple piles on flat ground.
Lowest Point: Uses the lowest point in your selection as the base.
Triangulated: Creates a base by connecting all points in your polygon.
Elevation Toolbox
It is often difficult to see the base of a stockpile in an orthomosaic image due to shadows. We recommend using the Elevation layer as your base map. This view makes terrain nuances visible and helps you avoid placing points on obstacles or nearby rocks.
Measuring on Different Layers
Sometimes it can be difficult to see the base of a stockpile when looking at the Orthomosaic image, due to shadows or similarly colored surrounding areas. To more easily see the nuances in the terrain, we recommend using the Elevation Toolbox as the base layer of the map when computing volumes.
Below is an example that demonstrates why using the Elevation Toolbox is a best practice when calculating volumes. In the Orthomosaic (on the left) it is difficult to see the small pile of rocks to the left of the stockpile. Defining the base layer on top of the small rock pile would lead to inaccurate volume calculations. Using the Elevation Toolbox (on the right), the small pile becomes easily viewable, enabling you to avoid defining a point of the base on top of the rocks.
Copying Annotations
Creating identical annotations is important for change-over-time mapping. For instance, if you have piles changing on a daily, weekly, or monthly basis you may want to consider copying annotations from map to map. This can be done natively within our app! Find this in the annotations drop-down of the left panel:
For more detailed instructions on how to copy annotations, click here: Copy Annotations
Importing Annotations
You now also can import annotations from a selected map into a current map. This is done in the same way we copy annotations; simply select that option from the drop-down menu.

Duplicate Annotations within the same map
You can now duplicate your Annotations within the same map!
1. Click on the Annotation you would like to duplicate
2. Click on the Duplicate button at the top of the left side panel - this will automatically duplicate your annotation on the map!
Understanding the Calculations
The volume calculations between the base plane and the terrain surface of your area of interest is given in terms of the volume that would need to be removed (in the case of a stockpile) and/or added (in the case of a hole) to flatten the surface so that it's the same as the surrounding ground.
Cut and Fill
DroneDeploy defines volume based on the material that must be removed or added to flatten a surface:
Cut: The volume you must remove from an area (a pile) to flatten it.
Fill: The volume you must bring in to fill a hole and flatten the area.
The final measurement uses the formula: Volume = Cut - Fill
Volume Measurements Over Time for GCP Maps
For Individual, Advanced, Teams, and Enterprise customers, you also have access to the Stockpile Report. This will compile your material and volume data in a concise and professional report.

FAQs
Q: Do I need GCPs for volume measurements?
A: GCPs improve global accuracy, but standard drone flights provide high local accuracy (typically 98-99%) for volumes.
Q: Can I change units?
A: Yes. You can display units in the metric or imperial system.
v2.2